Hvordan ta bilder av nordlyset - tips & triks
- Reidar A.
- 21. feb. 2022
- 8 min lesing
Oppdatert: 1. sep. 2022
Som naturguide er det flere områder en må beherske for å gi gjestene en totaloplevelse når de er med deg på tur. Foto, og til dels video, er det flere og flere som forventer at guiden tar seg av, og for ekskursjoner som inneholder elementer av nordlys er det spesielt viktig å være komfortabel med fotografering når det er kaldt og mørkt. Bloggposten er opprinnelig skrevet på engelsk for siden thearcticmoments.com. Kommenter gjerne under om dette er noe du kunne tenke deg å også ha på norsk, kanskje vi klarer få det til :-)
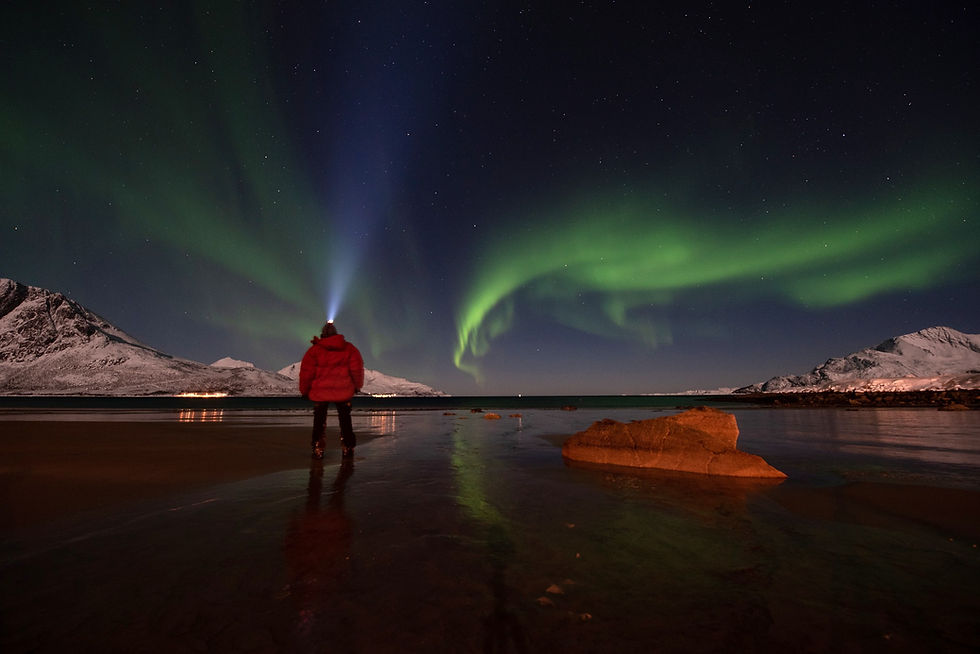
Photographing the aurora is not that difficult, but there are some ground rules. The environment where we are waiting is usually dark and cold, with big Norwegian moose lurking around. The northern lights are also very unpredictable, and even on days where both the forecast and sky are forecasting in our direction, you might end up spending 6 hours outside with nothing else than frostbite and a lot of fresh air to bring back home.
The advice given here is based on practical experience photographing the northern lights all over Norway and dealing with a lot of guests and different cameras since 2006. If you need tips on how to dress while up here, you should also read this post.

Get a tripod. You will do long exposure photography and the camera needs to be fixed. If you do not have a tripod, put the camera on the ground, on the car hood, on a backpack etc. Some even bring a bag of rice to protect and steady the camera. It is nice for support, and when you leave Norway you can just throw the rice.
A lot of the guests that we take out during the northern lights season have nice and expensive cameras that they don’t know how to use.
Practice with the camera. This is probably my best advice. A lot of the guests that are taken out during the northern lights season have nice and expensive cameras that they don’t know how to use. You do not even need a high-end camera, but be able to put it in manual mode (M), and know how to tweak the ISO, aperture and shutter speed settings (explained further down). Practice outdoors just after the sun has settled or at night, that should give you an idea of how your camera is working and where all the buttons are. If you want to go all the way, practice with gloves or mittens.


Focus. The focus is easily forgotten, and getting focus in the dark can be a bit tricky. We usually use the moon, streetlights, or a headlight/friend to get the camera in focus. Just ask your buddy to move about 20 meters away, and focus on the phone or headlight. Once focused, turn the focus to manual (MF) to avoid the focus working again on the dark sky. The most common mistake when doing photos in the dark is having the focus set to auto (AF) - and the challenge is that the camera just has nothing to focus on, and therefore won't take a picture, or end up unfocused with blurry pictures as a result.
If you are really eager or do not need the camera during the remainder of the day, you can set your focus when it is daylight outside and leave it there for when it gets dark.
If you are really eager or do not need the camera during the remainder of the day, you can set your focus when it is daylight outside and leave it there for when it gets dark. Find something in the distance, for example, a mountain. Set your focus point between the mountains ridge and the blue sky, and you should be good to go later in the evening. If you are also traveling with a white marker it is always a good idea to mark your endless focus on the lens itself, just in case you should bump into something between setting your camera and nighttime.
As to your pictures, be sure to zoom in on the photos in your camera's review mode to see if your shots are coming out clear - something that is very easy to see if there are stars (they should be round and "crisp"). There's no worse feeling than taking photos in the cold for hours, only to realize the next morning that they are all blurry and out of focus.
Cold weather and battery. The cold weather normally does not have any influence on the camera. The battery however is another story.
If you got more than one battery, keep a spear on your body. Another strategy is to keep the battery on your body when the sky is calm and put it in the camera when the northern lights appear. I have seen many photographers waiting for hours to find that they have enough battery for a few pictures when things start to happen – if any battery at all.
Some might tell you to bring 5-7 batteries to get through the night. Normally 1-2 will be enough, and for my Nikon D750, 2 batteries are sufficient even on the coldest nights. In fact, one of the batteries lasted a whole week at 78 degrees north during the winter - it got to stay in my sleeping bag during the night.
Temperature change. If you find yourself in a situation where it is possible to stay in a warm and cozy cabin, tent, lavvo, etc. you are lucky. At the same time, the camera and lenses do not like temperature change and will fog up and freeze. The best is to leave your camera outside and bring the battery inside with you, in a pocket close to your body. Remember to put the camera somewhere where no one can step on the camera or stumble.

Basic settings. The northern lights are never the same, meaning you can almost never use the same settings from one evening to the next. Strong lights require short exposures, and weak lights require the opposite. Then again you have fast lights, big lights, very colorful lights, and so on.
Shutter speed. This is the amount of time you take the picture, the time the shutter is open. A "normal" shutter speed can be anywhere between 1 - 30 sec; depending on what you are trying to achieve.
Aperture. In general, you want your aperture to be as open as possible (meaning the lowest number possible) for northern lights photos. Most kit lenses (the ones sold with the camera) will go as low as f3.5 - 5.6, and the best lenses will go even lower to anywhere from f0.95 - f2.8. Fixed lenses are usually sharper than zoom lenses. To get clear pictures it can sometimes be an idea to go one stop up from your lowest setting, but that depends on the lens.
Aperture also controls the field of focus, meaning that on a low aperture it is difficult to get both the foreground and the background in focus. This is more of a challenge when you learn more, but keep it in mind if you are trying to get your partner's face and the northern lights clear in the same picture. An aperture of f5.6 usually does the trick, but then you will need to turn up the ISO and/or shutter speed to get the same exposure. It`s a game of give-and-take.

ISO relates to how sensitive your film or digital sensor is to light. On smaller cameras, the ISO usually peaks around ISO3200, and on very expensive cameras they exceed an ISO 120000, which has no practical value. A higher ISO will surely pick up on more light, but at the same time make your picture grainy (also called digital noise). On full-frame DSLR or mirrorless cameras, you can usually go higher on the ISO without getting noisy images, within limits. My full-frame Nikon D750 can go as high as 6400 without too much noise.
The RAW and JPEG format. The names might sound a bit cryptic, but are only names on different file formats. The .jpeg or .jpg is the smallest format giving you less data to play with later, but does not take up as much space on your memory card or hard drive. All cameras are able to shoot in this "mode". The RAW format is being used by "professionals" that want more room to work when editing the photos. A picture done in RAW takes up about 4 times as much space as a picture done in .jpeg due to saving more data in each picture file. On some cameras it is possible to do both formats at the same time, giving you a lot of options when editing.
My basic startup settings when the lights first appear are (almost) always ISO 1600, aperture f2,8 - 4.0, and a shutter speed of 3 seconds. On small sensor cameras the ISO might have to be a bit higher and the shutter speed a bit longer. If you are doing your photos from a moving surface, lets say a ship, you will (or must) always try to push the ISO to get your shutter speed as fast as possible to avoid blurry images. Finding the correct settings for your camera gear is something that requires some practice, and knowledge of your specific camera.

White Balance. Shooting in RAW ) you can always change your white balance in post-processing. If you want to get into details, and need to set your white balance before shooting, set the Kelvin ( K ) mode at values between 2800 - 4000, it usually works well for night and northern lights photos. On most cameras, the “daylight“ white balance settings will be the best if you shoot in the less space-consuming .jpg file format.
Self-timer. Some photographers use a tether, a cable going from the camera to a remote control (you also get them without the cable). This is to avoid shaking the camera when pressing the shutter. I find that this is usually not necessary as you can use the self-timer on most cameras to achieve the same result. Some days I don´t even bother, and the pictures come out nice and crisp anyway. This is of course dependent on your tripod and camera. Most new-ish cameras also have wifi and/or Bluetooth, and the camera shutter is possible to control from your phone. I would not spend a lot of money on this kind of equipment for basic northern lights photography, if any at all.
Mobile phones. Most phones (this is, of course, changing by the minute with new technology) will not be able to give you more than hints of green lights on the memory card, and probably run out of battery during your wait. The advantage of newer smartphones is that it is possible to download applications that let you gain manual control - some even have this function built-in. The mobile should be fixed on a tripod as well.
Update:
The iPhone 13 Pro did this, handheld, last weekend. It is impressive what has happened over just a few years.


—-—

There are plenty to choose from when it comes to applications (or "apps" for short), just search for ”northern lights” or “slow shutter” and you will get a list with user ratings. On nights with reasonable strong lights, it is possible to get pictures that are good enough for a Facebook update. One application that we use a lot is called „slow shutter“ and you will find it in the app store and on google play.
GoPro. The GoPro is an action camera, and has more or less the same challenge as mobile phones – the ISO is pushed very high in night mode (resulting in noise), and the shutter speed is normally very long. I have only worked with the GoPro 3 and 4, and the battery life in cold weather is even less than on most phones. That said I have seen OK results with newer GoPro cameras in night mode. This is on nights with decent lights, and both the quality of the pictures and timelapse sequences has sometimes surprised me. The same as with mobile phones applies here, technology is changing by the minute.
Forecasting the northern lights. Northern lights forecasting is tracking the activity of the sun, and can with reasonable accuracy give us a 27-day forecast. We have used several different applications for iPhone over the years, and are now using three different ones that show basically the same data in different ways.

The forecasts are surprisingly accurate on most nights. In addition, you will need a weather forecast application to track clear sky - we use a Norwegian one called yr.no, together with the more known windy.com.
If you need to check the northern lights forecast online, this is what I use:
If you still have a question, you are probably not alone - ask them below and we will get back to you as soon as possible.


Kommentarer